Previously, I wrote about how to create your own custom post types in WordPress. By leveraging WordPress custom fields, taxonomies, and post types, you’re not just managing content—you’re building a scalable, modular publishing platform. These tools empower developers and content creators alike to go beyond the blog and build complex websites with intuitive content structures.
Whether you’re showcasing reviews, portfolios, or any kind of custom content, custom fields and taxonomies give you the power to shape WordPress around your unique needs.
Creating your own taxonomies
The process of creating custom taxonomies is similar to creating custom post types. As with post types, I strongly recommend defining your taxonomies in a custom plugin rather than relying on third-party tools. This gives you more control and ensures long-term stability in your WordPress installation.
To quickly scaffold your taxonomy code, I use WP Generator’s Taxonomy Generator, which helps define your taxonomy with the register_taxonomy function.
Here are some essential arguments to configure:
- ‘hierarchical’ – whether the taxonomy should support nesting (like categories) or, if set to false, be treated like tags.
- ‘public’ – whether this taxonomy can be viewed either in the frontend or administrative interface. You will most likely want this to be set to true. This will, in turn, set default values of other variables that control visibility of the taxonomy in different settings.
- ‘show_in_rest’ – whether the taxonomy is available in Gutenberg blocks
// Register Custom Taxonomy
function custom_taxonomy() {

	$labels = array(
		'name'                       => _x( 'Taxonomies', 'Taxonomy General Name', 'text_domain' ),
		'singular_name'              => _x( 'Taxonomy', 'Taxonomy Singular Name', 'text_domain' ),
		'menu_name'                  => __( 'Taxonomy', 'text_domain' ),
		'all_items'                  => __( 'All Items', 'text_domain' ),
		'parent_item'                => __( 'Parent Item', 'text_domain' ),
		'parent_item_colon'          => __( 'Parent Item:', 'text_domain' ),
		'new_item_name'              => __( 'New Item Name', 'text_domain' ),
		'add_new_item'               => __( 'Add New Item', 'text_domain' ),
		'edit_item'                  => __( 'Edit Item', 'text_domain' ),
		'update_item'                => __( 'Update Item', 'text_domain' ),
		'view_item'                  => __( 'View Item', 'text_domain' ),
		'separate_items_with_commas' => __( 'Separate items with commas', 'text_domain' ),
		'add_or_remove_items'        => __( 'Add or remove items', 'text_domain' ),
		'choose_from_most_used'      => __( 'Choose from the most used', 'text_domain' ),
		'popular_items'              => __( 'Popular Items', 'text_domain' ),
		'search_items'               => __( 'Search Items', 'text_domain' ),
		'not_found'                  => __( 'Not Found', 'text_domain' ),
		'no_terms'                   => __( 'No items', 'text_domain' ),
		'items_list'                 => __( 'Items list', 'text_domain' ),
		'items_list_navigation'      => __( 'Items list navigation', 'text_domain' ),
	);
	$args = array(
		'labels'                     => $labels,
		'hierarchical'               => false,
		'public'                     => true,
		'show_ui'                    => true,
		'show_admin_column'          => true,
		'show_in_nav_menus'          => true,
		'show_tagcloud'              => true,
		'show_in_rest'               => true,
	);
	register_taxonomy( 'custom_tax', array( 'post' ), $args );

}
add_action( 'init', 'custom_taxonomy', 0 );
Then, attach this taxonomy to your custom post type using:
'taxonomies' => array( 'category', 'post_tag', 'custom_tax' ),Adding custom fields to post types
Custom fields give you the power to enhance your post types with unique data points—from ratings and reviews to dates, links, and more.
You can manually add fields through code or use a plugin. For most projects, I recommend using a plugin like Custom Field Suite, which offers flexibility and a visual interface. You can check out my earlier article on other useful third-party WordPress plugins.
Why Use Custom Field Suite (CFS)?
• Field Groups: Organize your fields logically.
• Conditional Logic: Show fields based on taxonomy terms or post IDs.
• Field Types: Text, date, WYSIWYG, Loop fields, and more.
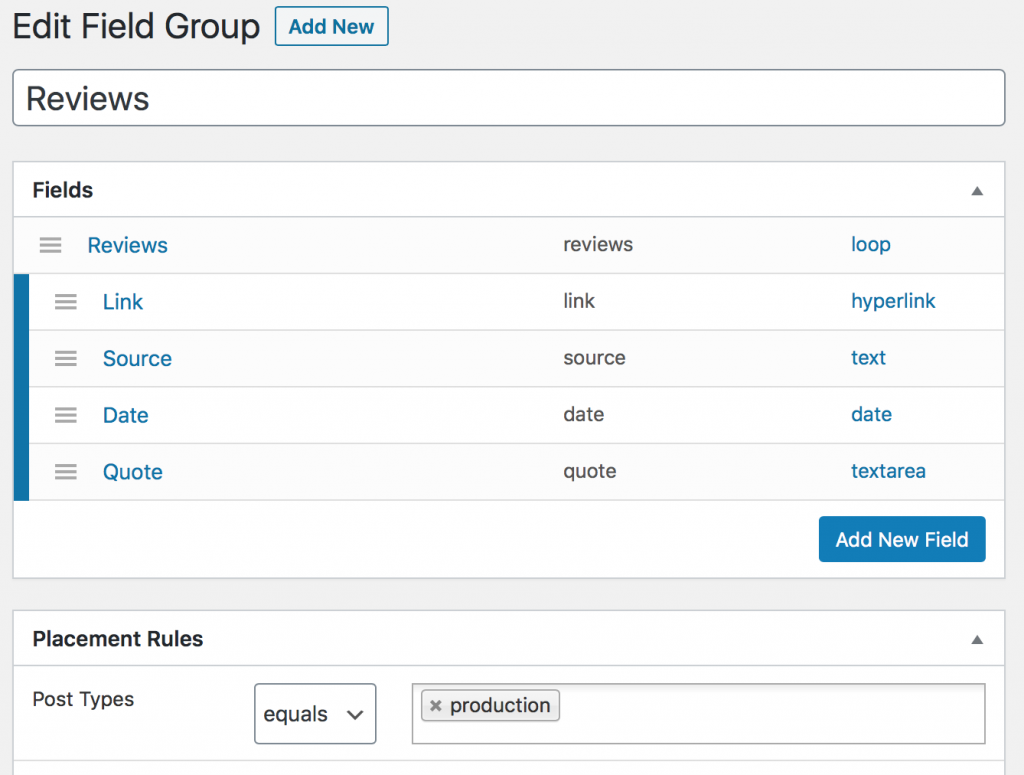
One of the most powerful features is the Loop Field, which allows you to group multiple sub-fields and repeat them. For example, we use this for user-generated Reviews on a custom post type called Production.

Displaying Custom Fields in Your Theme
After setting up your fields in CFS, you can render them in your theme files using:
<?php
$reviews = CFS()->get( 'reviews' );
foreach ($reviews as $review) {
echo '<h3><a href="'.$review['link']['url'].'" target="_blank">'.$review['link']['text'].'</a></h3>';
if ($review['source'] || $review['date']) echo '<p><strong><em>'.$review['source'].'</em> '.date('F j, Y',strtotime($review['date'])).'</strong></p>';
echo '<p><em>'.$review['quote'].'</em> <a href="'.$review['link']['url'].'" target="_blank"><strong>Read Review</strong></a></p>';
}
?>This code would be added to an appropriate theme file within WordPress’ template hierarchy. In the case of a custom post type, we can make a copy of the single.php template and name it according to our custom post type name. In this above example, the file name is production.php. If the custom post type name_has_underscores the filename would be name-has-underscores.php.
Conclusion: Unlocking WordPress Flexibility
By leveraging WordPress custom fields, taxonomies, and post types, you’re not just managing content—you’re building a scalable, modular publishing platform. These tools empower developers and content creators alike to go beyond the blog and build complex websites with intuitive content structures.
Whether you’re showcasing reviews, portfolios, or any kind of custom content, custom fields and taxonomies give you the power to shape WordPress around your unique needs.